Blisters are the Achilles heel of the modern-day tramper or hiker.
Easily preventable, yet completely debilitating, they can grind a tramp to a halt as well as remove the enjoyment the walk would otherwise provide.
Treating patients with avoidable tramping injuries is becoming more common for Greg Woolman, head podiatrist at Christchurch's Sports Clinic.

Greg Woodman, head podiatrist at Christchurch's Sports Clinic. Photo: Supplied.
With broad experience in research combined with his hands-on experience working with elite athletes and sports teams, Greg has important yet easy footcare advice to help trampers avoid those niggles while out on the tracks, and ultimately remain injury free.
Greg Woodman's footcare advice for trampers
You pack a Personal Locator Beacon (PLB), but what do you take in your First Aid Kit to ensure that you can manage blistering and avoid walking half the speed (or distance) you anticipated? Fair to say that good socks and boots are both key to blister prevention.
Blisters form as a result of excessive friction between the skin and the tramping boot (or shoe). Starting off as a 'hot spot” on the foot, continual friction causes the dermal layers to delaminate with tissue fluid forming inside the skin pocket that is created. This bubble of fluid is contained by the damaged skin layers becomes highly sensitive. Continual tissue damage can lead to wound bleeding which is more painful and more difficult to manage. If you feel a hot spot developing stop walking and prevent blistering before it's too late.
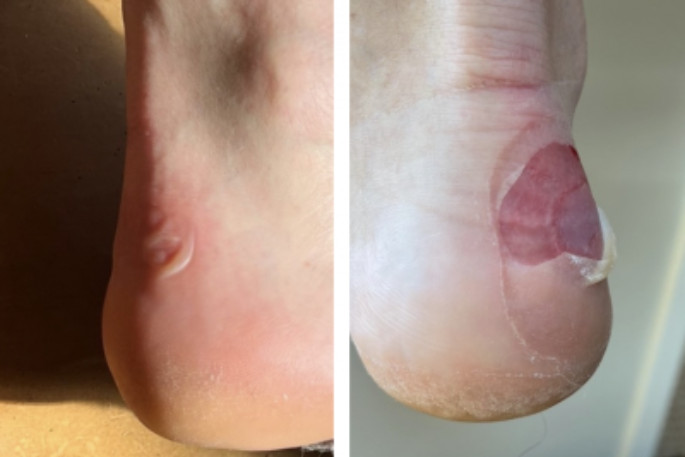
A blister from 2 hours and then 9 hours of tramping. Photo: Supplied.
Preparation
Before you start off make sure you have already tested and are happy with your boots, insoles, and socks. Make sure you have tested your combinations on similar terrain, similar duration that you will be hiking.
Condition the skin on your feet by going barefoot regularly, plus try daily soaks of surgical spirit or salt water to help dry out the skin to toughen. Research has shown that wet or damp skin is more prone to blistering.
Before you set off, use a stick lubricant on the soles, toes and heels as this will reduce friction. Do this for each day of tramping before you set off.
Choose your socks carefully. 'Merino” and 'Coolmax” are the most moisture wicking textiles to help keep moisture away from the skin so do check out fibre content and experiment with socks well in advance.
Your boots….these are key to blister management.
The Foot First Aid Kit
An adequate first aid kit for your feet is your only hope of rescue if blistering occurs. Here is our stock list of items that you should carry as a minimum.
- Safety pin
- Hydrocolloid dressings – Compeed, Nexcare, Bandaid
- Silicon digital sleeve
- Hikers wool
- 38mm Sports tape – ½ roll minimum
- Sterile dressing pads 5cm x 5cm
- Waterproof Band Aids
- Scissors (small yet strong enough for nails)
- Tweezers
- Alcohol wipes (this is antiseptic as well as cleaning skin for better tape adhesion)
- Antiseptic solution or individual wipes – i.e. Betadine 15ml
- Stick lubricant - Compeed blister stick, Run Guard, Footglide
- Compressed self-adhesive felt, fleecy web (Carnation), or thin foam sheet (Scholl) or a Chux sponge if you want to improvise
- Paper clip (releasing blood from bruised toenails)
- Disposable gloves (don't throw away as may need to reuse)
These additions to your standard First Aid kit are minimal and won't bulk it up at all. We also have some suggestions of what you can improvise if your kit is empty, to keep you walking with minimal pain.
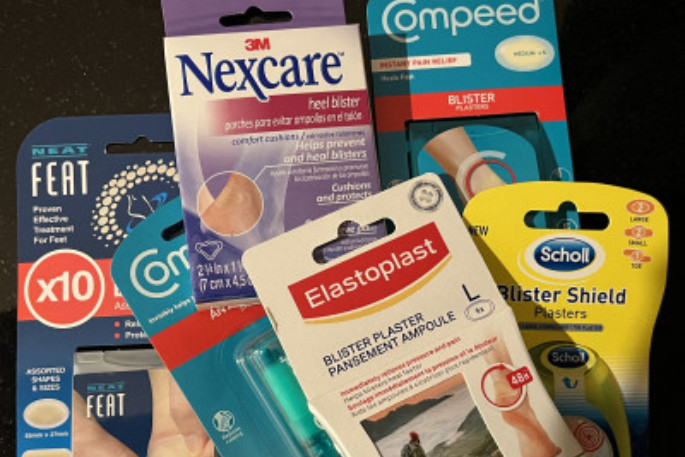
Blister dressings. Photo: Supplied.
Hydrocolloid dressings
Carrying a stock of hydrocolloid blister dressings is essential. These have a gel type pad incorporated into a clear or opaque adhesive film.
Research has proven these dressings to be far superior as they have better adherence, protect better and reduce pain far more than standard dressings. So don't leave home without these, just make sure you have enough sizes to cover-off the key sites. Tip: Check the expiry as they will dehydrate over time.
Treating the blister
Tackling blisters by managing the damaged skin on the foot itself may be all that is required.
If a blister is still intact and fluid filled then best to reduce the pressure by lancing.
Sterilise the end of your safety pin with a lighter, then make several holes in the blister and allow it to drain. Depending on the size of the blister there might be a decent amount of fluid to mop up. Try not to tear the delaminated layer.
Use an alcohol wipe clean-up the surrounding skin and also the intact (or torn) blister.
Allow to dry well, as this will ensure better adherence of the dressing. If you had a small amount of antiseptic solution (not cream) - apply a dab of this and allow to dry. Next apply a hydrocolloid dressing with firm application and without wrinkles. Tip: It won't stick to wet skin.
If you have a few days tramping ahead then cover this dressing with decent length strips of sports tape to hold it in place as otherwise it can slide off the wound. This dressing may have to remain in place for the duration of the tramp so better to do it right first time. Avoid any wrinkles in sports tape as this could cause a blister.
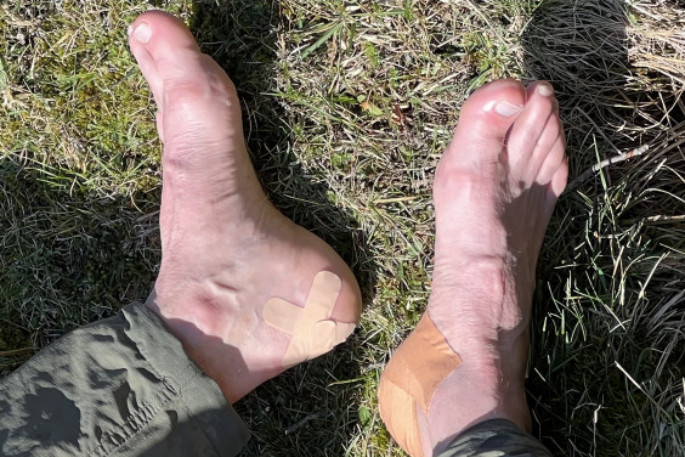
Don't be miserly with tape. Photo: Supplied.
Reducing pressure
Irrespective of using a dressing to protect the blister, reducing pressure and friction is often essential.
Offloading the area with a donut approach can immediately take pressure off the painful area. Hikers wool / felt padding / foam sheet / trimmed gauze dressings / even duct tape to create a donut shaped pad may be essential to keep the pressure off.
Blisters on the toes are a little more straight forward. The use of hiker's wool wrapped around the toe works well. Silicone gel sleeves can also be applied to painful toes and are handy to have for any toe that blisters.
Blisters on the sole of the foot are trickier to manage. The ball of the foot is difficult to offload completely. Remove the insole from the boot and on the underside add cut sponge, foam, or cloth layers in a donut or U shape and hold with Sports or Duct tape. The blistered area sits inside the cavity created. The thickness of the offloading pad needs to be trialed and will need to be at least 2-3mm thick to be effective.
To manage blistering in the arch of the foot the removal of any arch pressure via cutting away the insole could be a simple fix. Cut away the upwardly curved arch portion of the insole and presto your pain could be gone! Use a sharp knife to thin out the underside of the insole as an alternative.
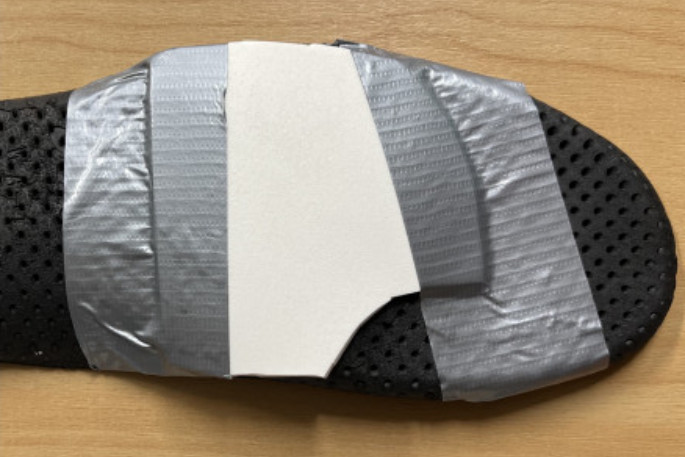
Duct tape a pad under the insole to offload. Photo: Supplied.
Other strategies
Heel blisters are by far the most common and occur from friction caused by heel movement inside the shoe. Immediate strategies are to have the foot and shoe move as one.
Revising your lacing to hold the heel down with a 'heel lock” lacing is worth trying as this generates good heel containment.
Hold the heel in place with a soft foam layer under the tongue of the boot. This could be thin low-density foam however using a Chux sponge, folded handkerchief, on top of the arch of the foot may work nicely.
A bit more extreme, however, consider removing the insole from your boot lower the heel slightly as this may relieve pressure. Alternately elevating the heel away from the area of boot irritation may work by using something underneath the insole. Use foam, folded cardboard, even a clump of moss to position the heel into a more offloaded position. Experimentation is needed as desperate times call for desperate measures!
If you hadn't already tried wearing a second sock to offload, then this is the time to try. Often the second sock simply adds to the pressure.
Remedies such as Vaseline may work however if desperate enough you could try lip balm to reduce friction.
Take home points
- Stop before it's too late – a hot spot will blister for sure
- Painful blisters usually require draining for immediate relief
- Hydrocolloid dressings are the bomb
- Tackle the cause and offload the area with padding from your kit or improvise
- Experiment with padding the insoles if you have blistering on the sole of your foot
Hopefully these tips place you in a better position to avoid or manage blistering and make your next tramp more enjoyable. If in doubt play it safe and talk to a podiatrist before you set off.
This article is one of a series written by sports podiatrist Greg Woolman for the NZ Mountain Safety Council.


0 comments
Leave a Comment
You must be logged in to make a comment.